- Download the source code http://www.w1hkj.com/files/flrig/
- untar the source code
- cd flrig*/
- sudo apt-get install checkinstall libxft-dev fltk1.3
- ./configure
- make -j4
- sudo checkinstall
That’s it!
That’s it!
En Ecuador es una marca muy popular un tipo de televisor marca Riviera.
Tengo un RIVIERA RLED-DSG32CHE3000 de unos pocos años atrás, y quise configurar el control remoto del Google TV (el nuevo Chromecast) que resulta que no le detecta automáticamente. Lo mismo me sucedió con Amazon FireTV
Luego de mil trabajos encontré que este TV Riviera DSG32CHE3000 usa el código de TV tipo Toshiba.
En este caso, el resto de la configuración fue muy sencilla, desde el control remoto Google Chromecast con Google TV le configuré un dispositivo tipo TV TOSHIBA y en pocos segundos pude realizar las dos acciones que más necesitaba que es que a través del control de Google TV se pueda apagar/encender el TV y subir/bajar el audio.
I have been running RS-HFIQ under raspbian and also under ubuntu Linux on a Raspberry Pi3 and currently under Raspberry Pi4. This is a very raw explanation on how to make it work RS-HFIQ under linux so I can use it as a guide in case I found myself having to reinstall it.
Here is my current Hardware:
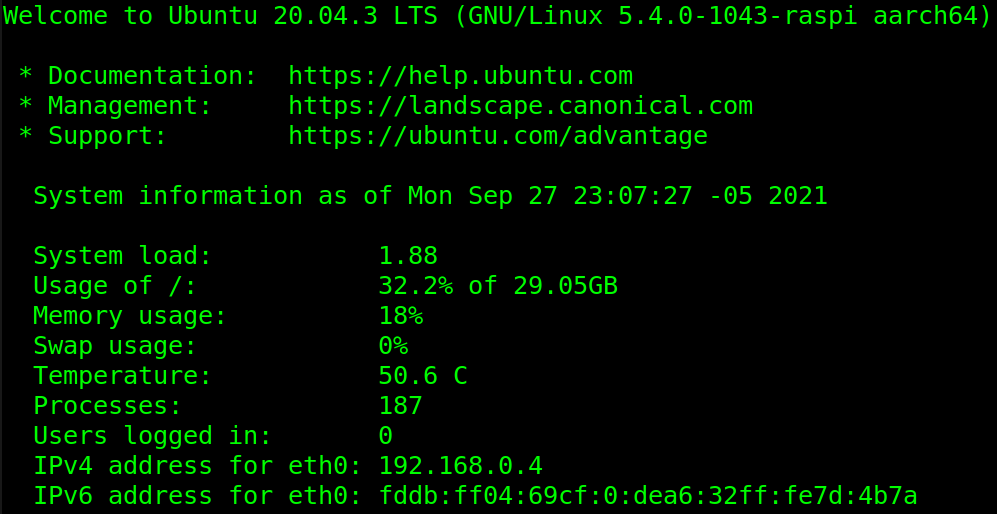
As you can see I’m running it in Ubuntu 20.04 LTS on a 4GB RAM RPI 64bits (aarch64). But I have also ran it under raspbian 32bits (for raspi 3) as well as under Fedora Linux
The Input and output is being made via a StarTech USB sound card (recommended by the author of RS-HFIQ). Exactly like this one https://www.startech.com/en-us/cards-adapters/icusbaudio2d
The winning hand here is to be able to install quisk as well as wsjt-x and make them both work together.
How I connected the RS-HFIQ to the USB sound card? Well I followed the diagram in this link: https://sites.google.com/site/rshfiqtransceiver/rs-hfiq-technical-information-site/faq-and-troubleshooting?authuser=0
Here is a picture of how to connect it: IQ OUT RX to MIC, and IQ IN RX to the headphones.

On the raspberry pi4 I installed ubuntu 20.04 LTS from here. You may install the latest DESKTOP version found here. If you install the SERVER it will come up in text mode only, so you will have to install the graphical packages. If you are unexperienced, you better install the DESKTOP version.
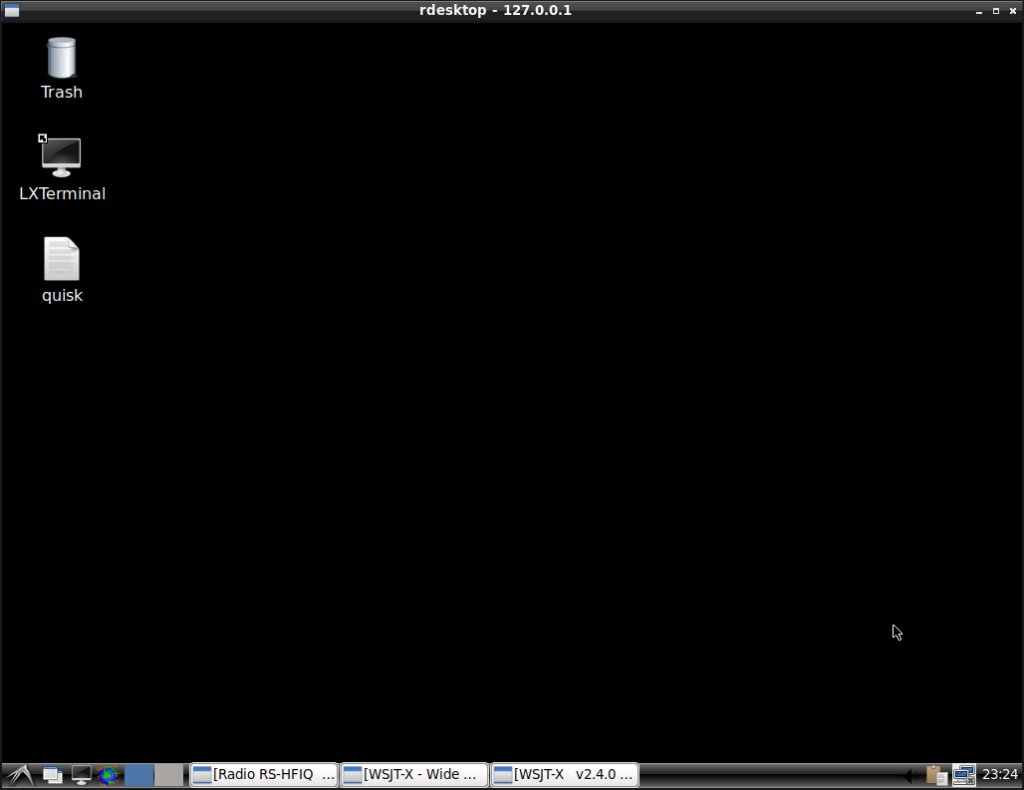
Of course you will notice there are several tasks already running (WSJT-X and QUISK). We will work on that, later,
I then proceed to install quisk, from the quisk website itself: https://james.ahlstrom.name/quisk/
I simply readed the whole page, and then proceeded to install quisk. https://james.ahlstrom.name/quisk/docs.html#Installation (look for the python3 install method in Linux, not the python2).
I’m pretty sure there was some package missing in the instructions but it was quite simple to find out and install it. Sorry, I can’t recall right now.
I tried then to start quisk by typing “quisk” in the linux terminal. It started, now you must configure it
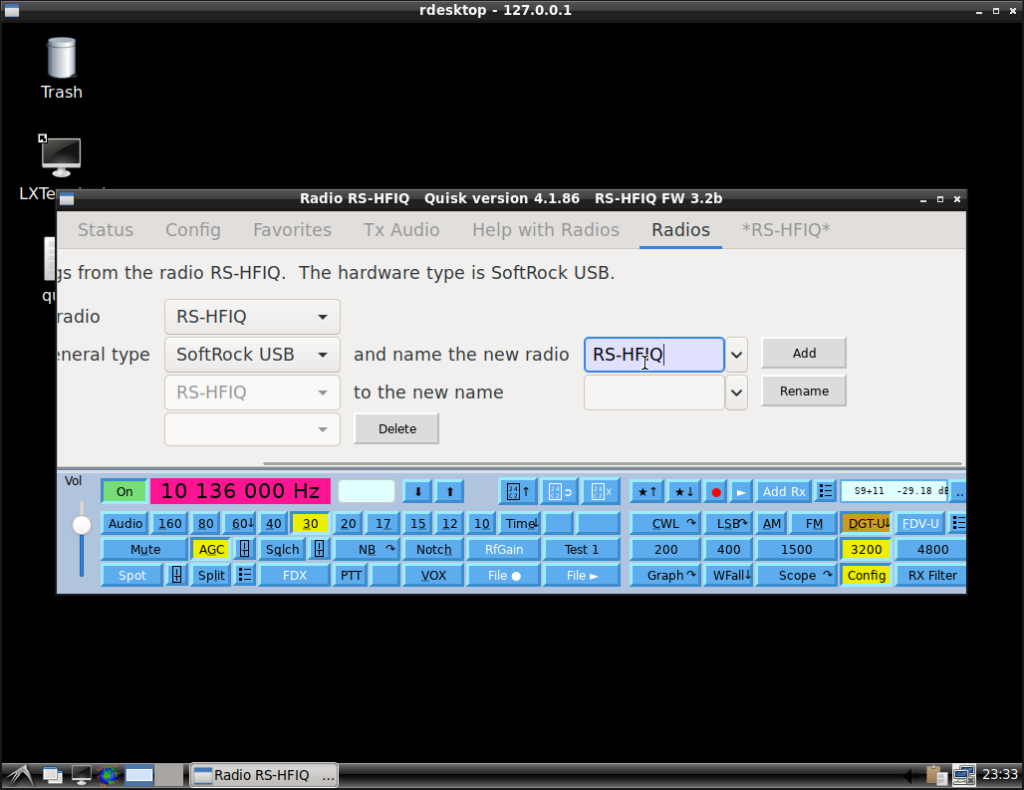
A new TAB with the chosen name will appear to the Right (See the TAB *RS-HFIQ* in my case. Ok, click that TAB.
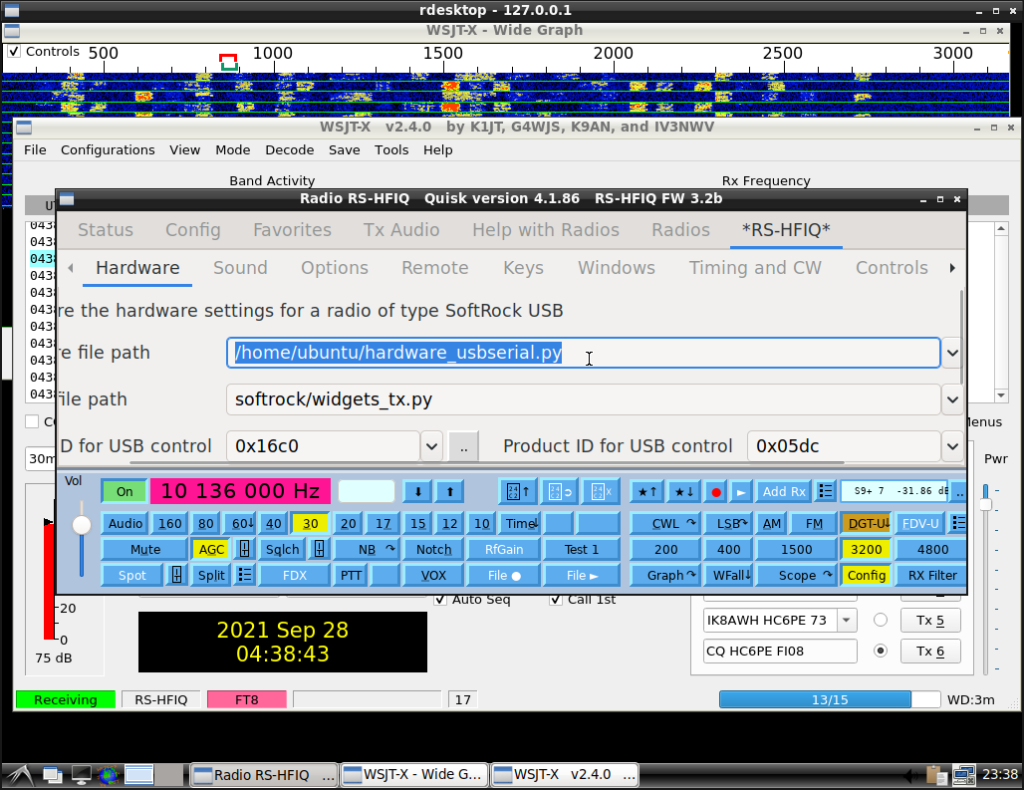
Now download hardware_usbserial.py from here https://github.com/dl1ksv/rshfiq take note of where you downloaded it. In my case I simply downloaded to /home/ubuntu/ as my username is “ubuntu”. So the full path is /home/ubuntu/hardware_usbserial.py
Adapt, change the option “Hardware file path” under *RS-HFIQ* TAB to fit the place where you downloaded the file, in my case /home/ubuntu/hardware_usbserial.py
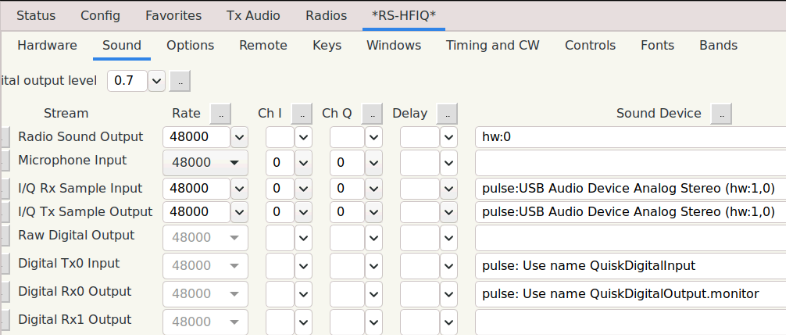
Now click on the “Sound” TAB and try to match exactly the options shown in the following image. Notice that, maybe the alsa hw:X,0 may change, in my case it is hw:2,0 but in your case X may be, for example, 1 (hw:1,0).
Under remote, match the “Remote” TAB options to the ones shown in the following screen capture:
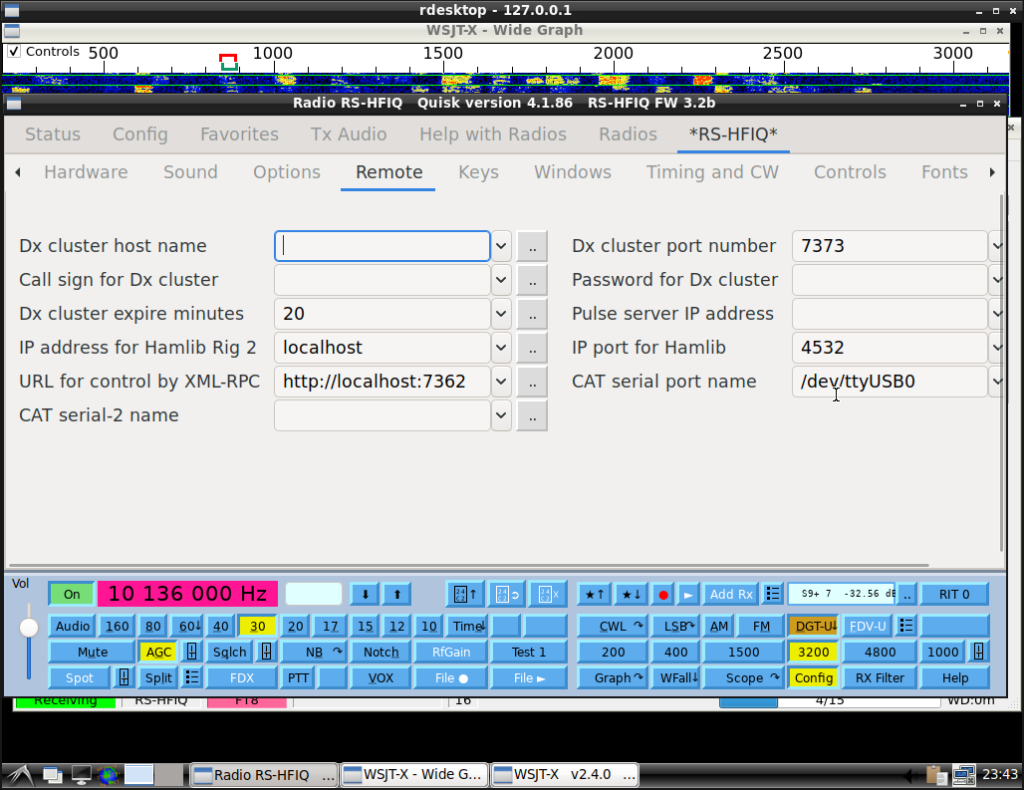
I did not recall having changed anything else. Just clicked the buttons to configure the mode to DGT-USB, the BW to 3200 and the start option to “Config” in the main window. Oh, and AGC as I can see now.
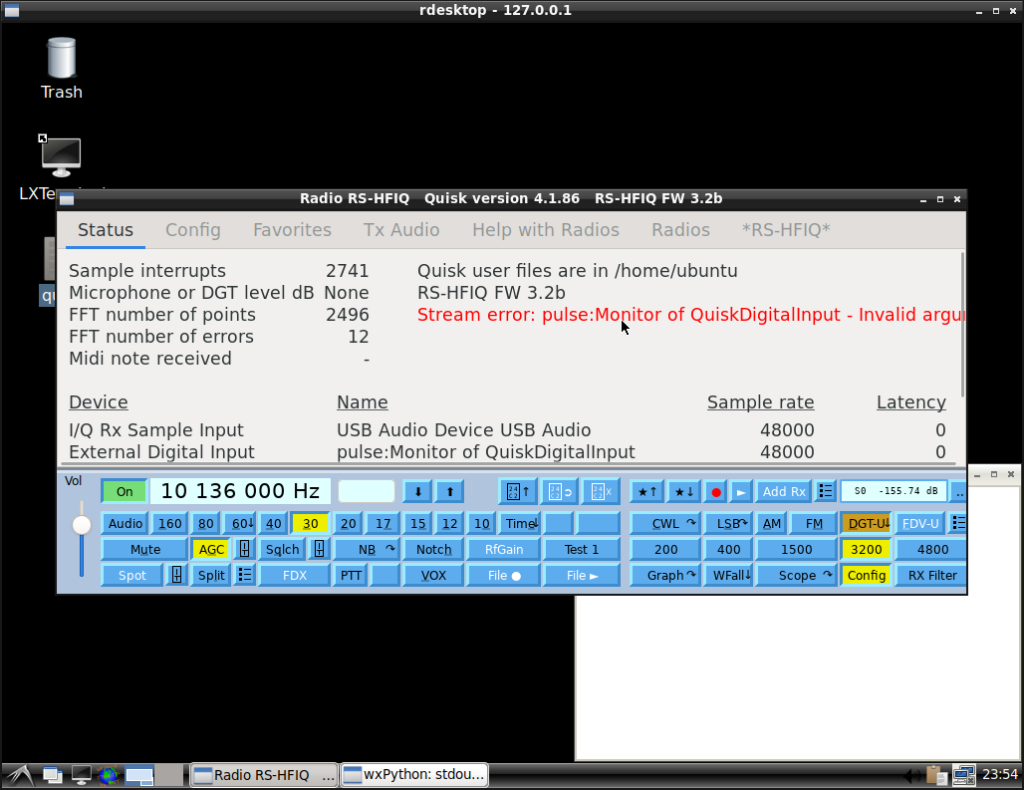
One important thing to mention here: If you notice an error (in red characters) saying “Stream error: pulse Monitor of QuiskDigitalInput”, that usually means that quisk was started before the QuiskDigitalInput virtual sound card was created. Simply close Quisk and open it again.
Here you will notice the red messages:
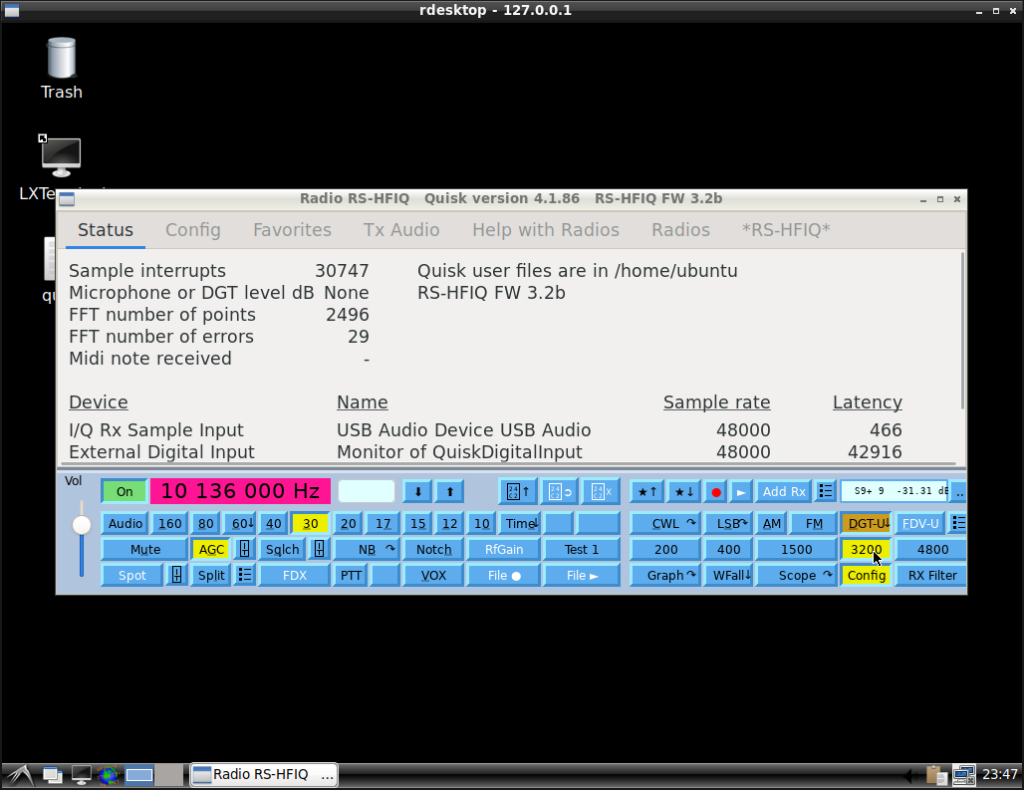
Here is quisk after you close it and reopen it, as you may see, the error message have dissapeared:
I then install wsjt-x:
sudo apt-get update && sudo apt-get install wsjtx
In my case I compiled the latest version (currently 2.4.0) but using the stock version from ubuntu should be ok.
After installing wsjtx, open it and compare/adjust the settings:
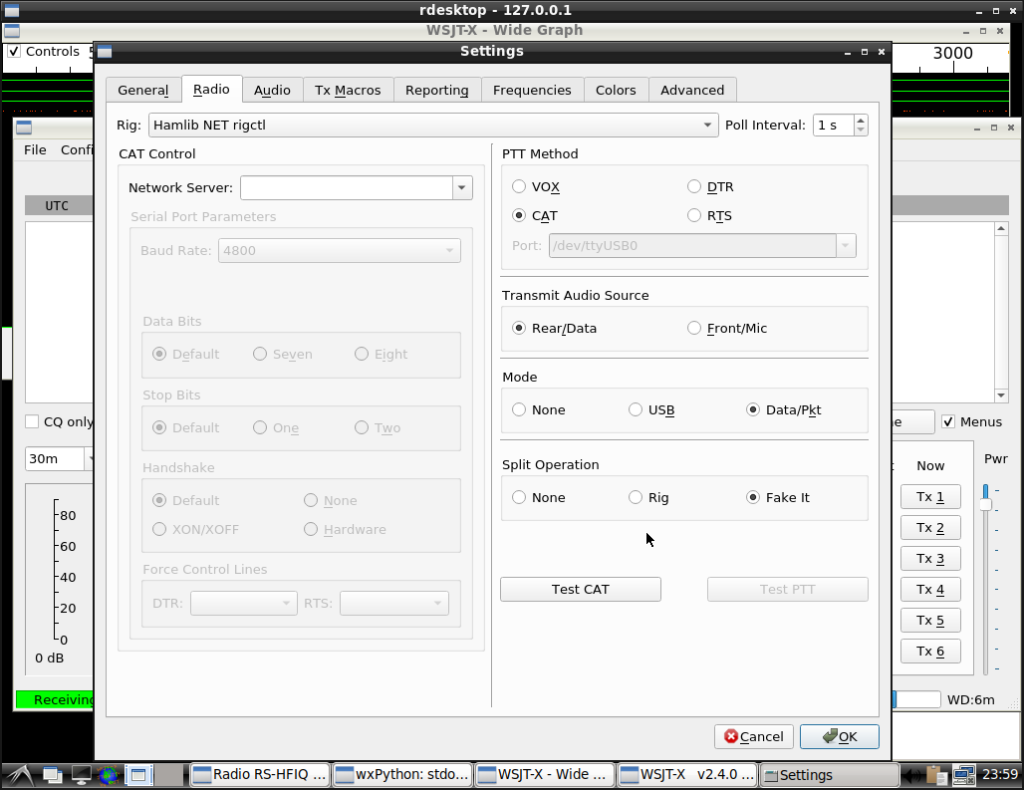
Under radio settings, try to configure it like this:
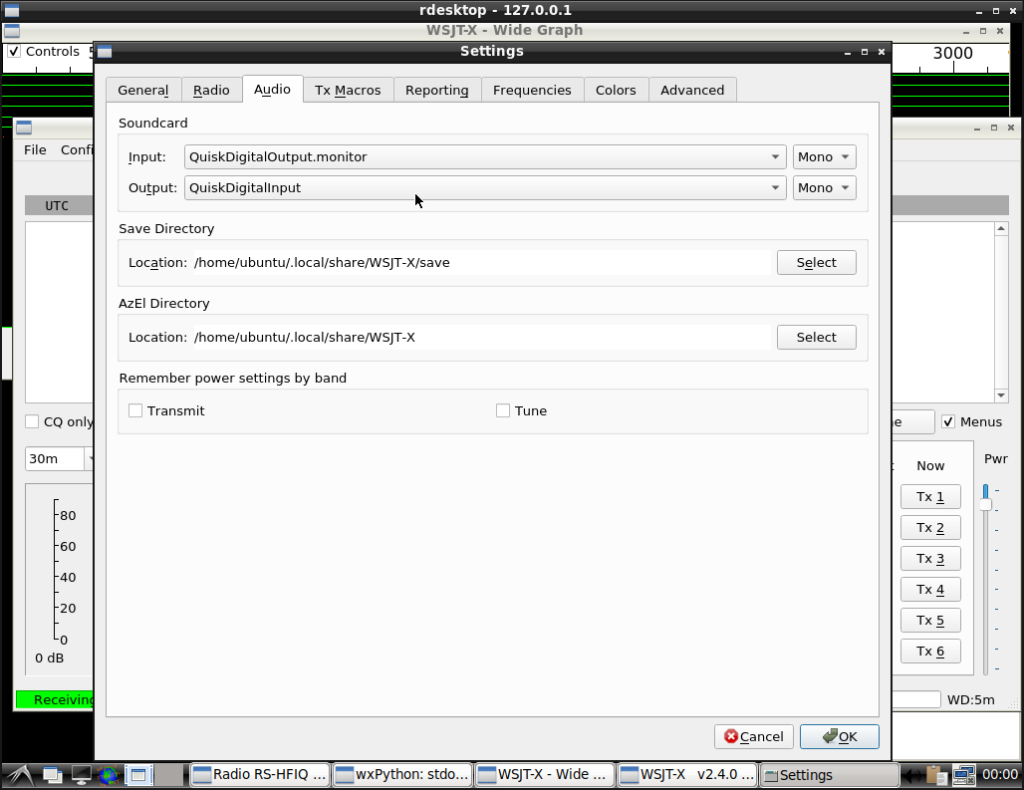
Under “Audio” configure it like this:
The rest of the settings tab is up to you to customize them
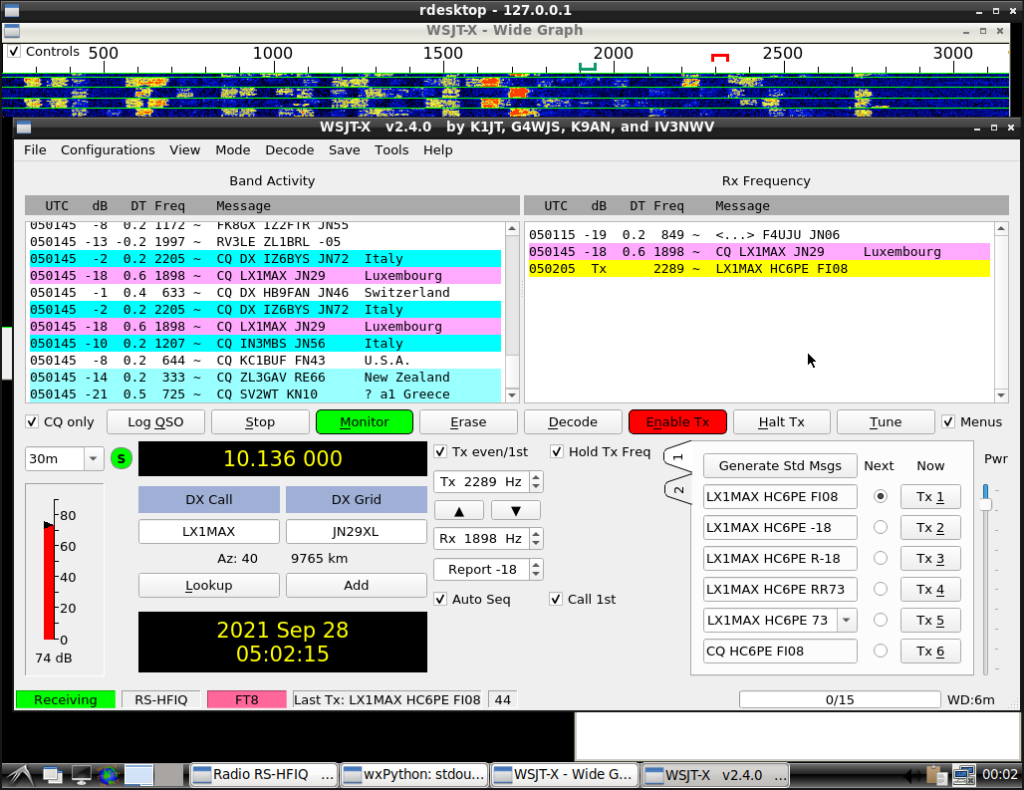
After configuring it, you will be able to change bands, click on tune, receive stations, and also make calls.
I recall there was an issue with earlier versions of RS-HFIQ and a firmware upgrade must be done in order for digimodes to properly work. This issue is outside the scope of this article, just bear in mind that you must be using version 3.2 or newer. In case you have a version <3.2, check the instructions for upgrading here: https://sites.google.com/site/rshfiqtransceiver/rs-hfiq-technical-information-site/arduino-sketch?authuser=0
Not enough power? You will probably want to check the audio output values. I set them to 100% using pulseaudio
Hace unos meses publicamos cómo echar a andar joomla con ssl vía letsencrypt. En el archivo adjunto a este post pueden encontrar al docker-compose.yml que creamos en este video. El archivo adjunto está comprimido con .gz para que los filtros de este sitio me permitan subirlo.
This small tutorial will show you how to build and install wsjt-x for your ARMBIAN. In my case I have an OrangePI PC board and armbian buster desktop. But this tuto should work for any other board. It should also work for any other Linux and architecture. E.g.: raspios, debian, ubuntu, etc.
I followed this tutorial for Linux Mint:
http://kb4lhp.blogspot.com/2018/12/recipe-for-building-and-installing-new.html
Lets start by installing some requirements:
sudo apt-get install build-essential checkinstall texinfo gfortran libfftw3-dev qt5-default qttools5-dev qttools5-dev-tools libqt5svg5-dev qtmultimedia5-dev asciidoctor libqt5serialport5-dev libqt5multimedia5 docbook-xsl xsltproc libxml2-utils dpkg cmake libusb-dev libusb-1.0 libudev-dev libboost-all-dev
Then download the latest tgz from https://physics.princeton.edu/pulsar/K1JT/wsjtx.html ex;
wget https://physics.princeton.edu/pulsar/K1JT/wsjtx-2.3.1.tgz
Lets extract the contents of this package and cd into the directory:
tar zxf wsjtx-2.3.1.tgz
cd wsjtx-2.3.1
And then, lets configure and build wsjtx:
cmake -DWSJT_SKIP_MANPAGES=ON -DWSJT_GENERATE_DOCS=OFF .
cmake --build . -- -j4
This process will take time depending on how fast is your CPU. After it finished, we will invoke the next command in order for it to build the .deb package. Pay attention you will have to modify option number 10:
sudo checkinstall
This package will be built according to these values:
0 -  Maintainer: [ [email protected] ]
1 -  Summary: [ WSJT-X version 2.3.1 compiled by HC6PE ]
2 -  Name:    [ wsjtx ]
3 -  Version: [ 2.3.1 ]
4 -  Release: [ 1 ]
5 -  License: [ GPL ]
6 -  Group:   [ checkinstall ]
7 -  Architecture: [ armhf ]
8 -  Source location: [ wsjtx-2.3.1 ]
9 -  Alternate source location: [  ]
10 - Requires: [ libqt5multimedia5 ]
11 - Provides: [ wsjtx ]
12 - Conflicts: [  ]
13 - Replaces: [  ]
Enter a number to change any of them or press ENTER to continue:
in here you enter “10” and add “libqt5multimedia5” (without the quotes). Then just continue and it will build the .deb:
Done. The new package has been installed and saved to
/home/radio/wsjtx-2.3.1/wsjtx_2.3.1-1_arm64.deb
Lets install it!
radio@pisdr:~$ sudo dpkg -i ~/wsjtx-2.3.1/wsjtx_2.3.1-1_arm64.deb
(Reading database … 112570 files and directories currently installed.)
Preparing to unpack …/wsjtx_2.3.1-1_arm64.deb …
Unpacking wsjtx (2.3.1-1) over (2.3.1-1) …
Setting up wsjtx (2.3.1-1) …
Processing triggers for man-db (2.7.5-1) …
And… it works!
hoy mientras instalaba un nuevo docker en CentOS-8 me topé por segunda ocasión que el contenedor no resolvía nombres de domino.
Cuando intentaba realizar alguna operación dentro del contenedor que requería resolver un nombre me devolvía error de que no podía resolver.
Por ejemplo, el contenedor era de CentOS, y cuando intentaba instalar un paquete (yum install….) me devolvía:
Cannot find a valid baseurl for repo: base/7/x86_64
Pero, puede ocurrir con cualquier otro comando (apt, dnf, ping, wget, curl, etc).
Para validar que efectivamente era un problema de mi servidor y no del contenedor en específico probé un docker muy sencillo “busybox” que tiene el conocido comando ping:
docker run --rm busybox ping -c 1 8.8.8.8
...
64 bytes from 8.8.8.8: seq=0 ttl=116 time=18.972 ms
--- 8.8.8.8 ping statistics ---
1 packets transmitted, 1 packets received, 0% packet loss
Como se puede ver, hace perfectamente ping desde un contenedor hacia 8.8.8.8
Ahora probaré lo mismo pero con un nombre, para que se vea obligado a resolver
docker run --rm busybox ping -c 1 www.google.com
ping: bad address 'www.google.com'
¡Efectivamente falla! no puede resolver una dirección.
Esto se debe a que en el firewall de nuestro CentOS-8 no se están permitiendo la resolución de nombres. Agrego la interfaz docker0 a la lista de interfaces confiables:
sudo firewall-cmd --permanent --zone=trusted --add-interface=docker0
sudo firewall-cmd --reload
Y ahora pruebo:
docker run --rm busybox ping -c 1 www.google.com
PING www.google.com (172.217.170.4): 56 data bytes
64 bytes from 172.217.170.4: seq=0 ttl=116 time=18.897 ms
--- www.google.com ping statistics ---
1 packets transmitted, 1 packets received, 0% packet loss
round-trip min/avg/max = 18.897/18.897/18.897 ms
Trabajó al 100% luego de esto!
This small tutorial will show you how to build and install wsjt-x for your ARMBIAN. In my case I have an OrangePI PC board and armbian buster desktop. But this tuto should work for any other board. It should also work for any other Linux and architecture. E.g.: raspios, debian, ubuntu, etc.
I followed this tutorial for Linux Mint:
http://kb4lhp.blogspot.com/2018/12/recipe-for-building-and-installing-new.html
Lets start by installing some requirements:
sudo apt-get install build-essential checkinstall texinfo gfortran libfftw3-dev libboost-log1.74 libboost-log qttools5-dev qttools5-dev-tools libqt5svg5-dev qtmultimedia5-dev asciidoctor libqt5serialport5-dev libqt5multimedia5 docbook-xsl xsltproc libxml2-utils dpkg cmake libusb-dev libusb-1.0 libudev-dev
Then download the latest tgz from https://physics.princeton.edu/pulsar/K1JT/wsjtx.html ex;
wget https://physics.princeton.edu/pulsar/K1JT/wsjtx-2.2.2.tgz
Lets extract the contents of this package and cd into the directory:
tar zxf wsjtx-2.2.2.tgz
cd wsjtx-2.2.2
And then, lets configure and build wsjtx:
cmake -DWSJT_SKIP_MANPAGES=ON -DWSJT_GENERATE_DOCS=OFF .
cmake --build .
This process will take time depending on how fast is your CPU. After it finished, we will invoke the next command in order for it to build the .deb package. Pay attention you will have to modify option number 10:
sudo checkinstall
Don’t create documentation (n)
This package will be built according to these values:
0 -  Maintainer: [ [email protected] ]
1 -  Summary: [ WSJT-X version 2.2.2 compiled by HC6PE ]
2 -  Name:    [ wsjtx ]
3 -  Version: [ 2.2.2 ]
4 -  Release: [ 1 ]
5 -  License: [ GPL ]
6 -  Group:   [ checkinstall ]
7 -  Architecture: [ armhf ]
8 -  Source location: [ wsjtx-2.2.2 ]
9 -  Alternate source location: [  ]
10 - Requires: [ libqt5multimedia5 ]
11 - Provides: [ wsjtx ]
12 - Conflicts: [  ]
13 - Replaces: [  ]
Enter a number to change any of them or press ENTER to continue:
in here you enter “10” and add “libqt5multimedia5” (without the quotes). Then just continue and it will build the .deb.
Exclude any missing file from package.
Done. The new package has been installed and saved to
/home/radio/wsjtx-2.2.2/wsjtx_2.2.2-1_armhf.deb
Lets install it!
radio@pisdr:~$ sudo dpkg -i ~/wsjtx-2.2.2/wsjtx_2.2.2-1_armhf.deb
(Reading database … 112570 files and directories currently installed.)
Preparing to unpack …/wsjtx_2.2.2-1_armhf.deb …
Unpacking wsjtx (2.2.2-1) over (2.2.2-1) …
Setting up wsjtx (2.2.2-1) …
Processing triggers for man-db (2.7.5-1) …
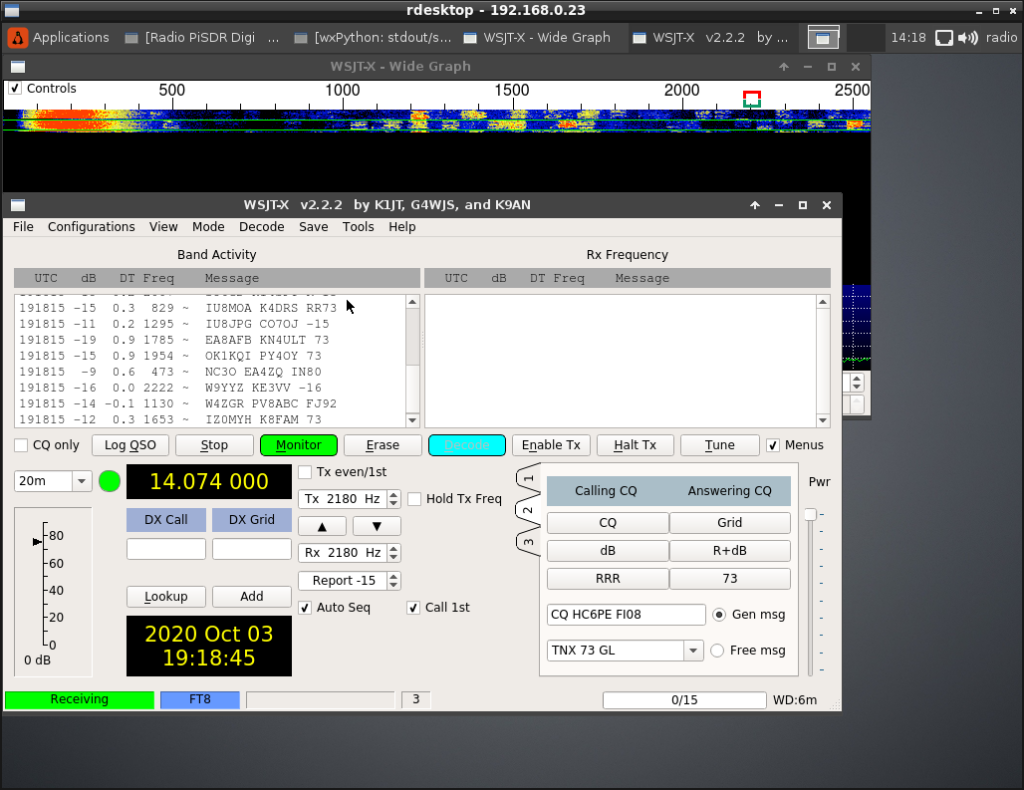
And… it works! Check the version, in my case it is 2.2.2, the same I compiled and installed.
En este en vivo explicamos e instalamos RasberryOS en un raspberry pi 3, con esto damos un paso importante para comenzar a usar nuestro RPi